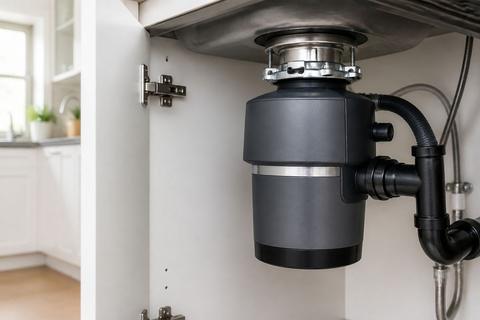
How to Install an InSinkErator Garbage Disposal
When you’re ready to stop food scraps from clogging your drain, learning how to install insinkerator garbage disposal is the fastest path to a cleaner, smoother kitchen sink. The hard part isn’t usually the grinding—it’s getting the wiring, mounting seal, and drain connections right the first time. If you follow the steps below in order, you’ll install your unit safely and avoid the most common leak and performance problems.
For more help, see our How to Install, Replace, or Remove an InSinkErator Disposal guide.
Before You Start
Check sink, drain, and power compatibility
Start by confirming your disposal actually fits your sink and disposal opening. Measure the sink opening and make sure it matches the knockout/disposal flange size required for your model. Inspect the existing drain setup: the disposal needs a compatible trap and drain-pipe alignment, plus clearance in the cabinet for the discharge elbow. Then verify electrical compatibility by checking the outlet or switch location below the sink and the disposal’s electrical rating (voltage/amperage) printed on the unit or in the manual. If the space doesn’t have room for the mounting assembly and discharge elbow, stop and adjust the plumbing plan before mounting.
Gather the right tools and installation kit
Before you loosen anything, gather tools and supplies so you don’t improvise mid-installation. You’ll typically need a screwdriver (flat and Phillips), adjustable wrench or pliers, a bucket, a flashlight, plumber’s putty (or the provided gasket, depending on model), and a 1/4-inch hex “Jam-Buster” wrench (often shipped with the disposal). Use thread seal compound if your model’s discharge connection requires it, and keep a small rag and paper towels for leak checks. Confirm the box includes the mounting assembly parts (mounting ring, gasket, screws) and any dishwasher inlet hardware.
Turn off power and clear the cabinet
Shut off power at the wall switch and at the circuit breaker if your disposal is hardwired or connected to an under-sink feed. To prevent accidental contact, do not rely only on the switch—turn off the breaker feeding the disposal circuit. Clear everything from the cabinet under the sink and place a bucket to catch residual water from the P-trap and existing connections. Remove items that could fall into the drain while you work. With power off, verify the disposal wiring is dead before touching any electrical components.
Remove the Old Disposal or Sink Flange
Disconnect the drain and electrical connections
Unplug the disposal if it uses a cord; otherwise, disconnect power at the breaker and remove the switch plate cover or junction cover as required by your model. Detach the dishwasher hose from the disposal inlet (if connected). For the drain, loosen the P-trap and any trap arm connections so the disposal discharge can fully separate. Use a bucket to catch water and keep rags handy. Once all connections are loose, slide the old disposal or flange assembly out enough to access the mounting hardware.
Release the mounting ring safely
Most disposals hold in place with a mounting ring that locks to the sink flange. Support the disposal with one hand while you work the lock mechanism with the other. If your model uses three mounting tabs and a turn-lock design, rotate to unlock while keeping the unit from dropping. Remove the mounting ring only after the weight is supported, since the unit can fall when the last lock releases. Keep the gasket material—remove it from the sink opening so you can start clean with the new seal.
Clean the sink opening and inspect the flange
Scrape away old gasket residue and debris from the sink opening. Wipe the surface dry so you can see the flange edge clearly. Inspect the sink flange for cracks, bends, or damage; a warped flange will cause leaks even with new gaskets. If the flange is heavily corroded, replace the flange rather than forcing a seal. Check drain alignment and cabinet clearance at this stage so the new mounting assembly sits flat without fighting the existing piping.
Install the Mounting Assembly
Assemble the sink flange and gasket
Place the new gasket or the supplied seal material onto the sink flange area following the model’s instructions. If your kit uses plumber’s putty instead of a gasket, apply a thin, even layer around the flange where the metal ring contacts the sink—do not overpack. Insert the sink flange into the opening and align it so it sits evenly. From below, fit the mounting hardware components as directed, keeping the gasket centered around the opening so it doesn’t pinch out during tightening.
Tighten the mounting ring evenly
With the flange seated, tighten the mounting ring in small increments and keep it level. Use the included wrench or appropriate tool and alternate sides so the ring compresses the gasket evenly. Do not fully tighten one side first; uneven compression creates gaps that lead to leaks at the top of the disposal. As you tighten, watch the flange movement—stop if the flange starts to shift or wobble. Aim for a firm, stable mount with no visible rocking.
Confirm a watertight seal
Turn on a small amount of water briefly at the sink and watch the flange area under the sink. If you see water emerging around the mounting ring or sink opening, shut off water immediately and re-seat the flange/gasket. Most flange leaks happen because the gasket is misaligned or the mounting ring wasn’t tightened evenly. Fix the seal before you connect drain pipes or wiring so you don’t have to backtrack later. Once the flange stays dry under a short water run, proceed to electrical and drain hookups.
Wire the Disposal and Prepare the Power Connection
Choose between a corded or hardwired setup
Decide based on your disposal model and existing wiring. A corded setup typically uses a properly rated plug (and a compatible outlet under the sink) for easier future replacement. A hardwired setup connects directly to the household electrical feed through a junction box and usually uses the disposal’s electrical cover plate. Match your model’s wiring diagram exactly—InSinkErator installations vary by model line and electrical configuration. If you do not have an outlet rated for the disposal or you must add wiring, use a licensed electrician.
Connect the electrical leads correctly
Turn off power at the breaker again before wiring. Remove the disposal’s wiring cover plate if present, then connect the incoming wires to the corresponding leads on the disposal per the diagram (typically black/hot, white/neutral, and green/bare ground). Tighten wire nuts or terminal screws firmly—no copper should be exposed beyond the terminal. If your unit has a ground screw, connect the green/bare ground to the disposal chassis as required. After wiring, fold leads neatly so they don’t interfere with the mounting components or cover plate.
Secure the strain relief and cover plate
Install and tighten the strain relief so the cable cannot be pulled out and so the wires stay protected. Route the cable so it has slack for service but does not get pinched when the disposal locks onto the mounting ring. Replace the cover plate securely, ensuring no wires are trapped between metal surfaces. Re-check that strain relief is tightened to remove cable movement, then move on to drain piping. Restore power only after you’ve completed the plumbing connections and are ready to run the disposal for testing.
Connect the Drain and Dishwasher Line
Attach the discharge elbow to the disposal
Locate the disposal’s discharge outlet and install the discharge elbow using the supplied clamp or gasketed connection. Align the elbow so it points toward the existing drain pipe route in your cabinet, minimizing bends. Tighten any clamp screws evenly and keep the discharge connection straight; a crooked connection can stress the hose or cause leaks. If the connection uses a gasket, seat it fully so it sits flush against the elbow and disposal outlet. Position the elbow before you lock the disposal in place so you have access and alignment room.
Align the trap and drain piping
Dry-fit the P-trap and trap arm connections to understand how the disposal discharge elbow meets the drain line. The disposal needs correct slope and alignment so water flows freely without backing up. Assemble the pipes loosely first, adjust the trap arm length, and ensure the connections don’t strain or pull the elbow out of alignment. Replace any old, cracked rubber connectors or worn gaskets during this stage. When everything lines up without forcing, tighten the fittings securely.
Open the dishwasher inlet if needed
If you have a dishwasher connected to the disposal, connect the dishwasher drain hose to the disposal inlet and ensure the inlet is actually open. New InSinkErator disposals ship with the dishwasher inlet sealed by a plastic knockout plug; if a dishwasher drain hose is being connected, knock out the plug with a screwdriver and remove it from the grind chamber first, or the dishwasher will not drain and can back up. After removing the plug, attach the hose using the correct clamp and route it without kinks. Seal or tighten connections as required by your hose clamp style.
Mount the Disposal and Test for Leaks
Lock the unit onto the mounting ring
With the mounting assembly ready, lift the disposal into position and align it with the mounting ring tabs. Rotate or lift to lock it securely onto the mounting ring so it cannot drop. Make sure the discharge elbow and drain connections are aligned before fully seating the disposal. If you struggle to align while locking, stop and adjust the elbow or plumbing position—forcing the disposal can misalign seals and discharge fittings. Once locked, ensure the disposal is supported by the mounting ring, not by the wires or plumbing.
Run water and check every joint
Turn on water at the sink and let it run while you inspect for leaks at every joint: sink flange area, discharge elbow connection, dishwasher hose connection (if installed), and the drain pipe/P-trap fittings. If you see water where the dishwasher hose meets the inlet, shut off water and tighten the clamp or replace the hose connection gasket. If water appears around the discharge elbow joint, loosen and re-seat the gasket/connection properly rather than just tightening harder. Keep paper towels ready so you can pinpoint exactly where moisture starts.
Test grinding, drainage, and reset features
Restore power and use the wall switch to operate the disposal with water running. It should start smoothly and grind food waste without heavy vibration. If the disposal hums but does not grind, it is almost always a jammed flywheel: turn off power at the switch or breaker, free the jam with the Jam-Buster hex wrench from below (insert into the hex socket and work it back and forth until it turns a full revolution), lift out the jammed object with tongs (never hands), then press the red overload reset button and restore power. If a disposal trips immediately, press the red reset button again after waiting about 10 minutes for the motor to cool (push it in until it clicks and stays in).
Common Problems After Installation
Fix leaks at the sink or discharge pipe
Diagnose leaks by location. Water at the top near the sink means the sink flange seal needs re-seating with fresh plumber’s putty or a properly seated gasket; remove the unit and reset the flange rather than leaving it. A side leak usually comes from a loose dishwasher/discharge hose clamp or a worn discharge tube gasket—tighten the clamp or replace the gasket and reassemble with correct alignment. Dripping from the bottom vent holes means the internal seal has failed and the unit needs replacement. After fixing, run water and inspect the exact leak point until it stays dry.
Troubleshoot a unit that will not power on
If the disposal won’t power on, start with the basics: confirm the breaker feeding the disposal is on and that the wall switch is switched on. If you have a corded unit, unplug it and plug it back in firmly. Then check the red overload reset button on the bottom of the unit: with the wall switch OFF, press it in until it clicks and stays in; if it pops back out immediately, wait about 10 minutes for the motor to cool and press it again. If power still doesn’t come on, check for a loose wire connection inside the wiring compartment and correct it per the wiring diagram.
Clear humming, jamming, or slow draining
A disposal that hums but does not grind almost always has a jammed flywheel. Turn off power, insert the 1/4-inch hex Jam-Buster wrench into the hex socket in the center of the underside, and work it back and forth until it turns a full revolution; remove the jammed object with tongs. For slow draining, check for a blocked inlet or partially clogged trap and ensure the dishwasher drain hose and discharge line don’t kink. Also verify the disposal discharge elbow alignment—pipes that are forced or too high can prevent proper flow. After clearing the issue, run water and grind normally to restore drainage.
Frequently Asked Questions
Do I need a plumber to install an InSinkErator garbage disposal?
Not always. Many homeowners can install one if the sink, plumbing, and electrical setup are already compatible. If you need new wiring, a new outlet, or plumbing changes, a licensed plumber or electrician is safer.
Can I install an InSinkErator disposal on any sink?
Most standard kitchen sinks can support one, but you need enough cabinet space, the correct sink flange size, and a compatible drain layout. Some sinks or counters may require extra parts or professional help.
Is it better to hardwire or use a power cord?
Either can work, but it depends on the model and your kitchen setup. A corded connection is often easier for replacement installs, while hardwiring is common in permanent installations.
Why does my new disposal leak after installation?
Leaks usually come from an uneven flange, loose drain connections, missing gaskets, or an improperly tightened mounting ring. Rechecking each seal usually solves the issue.
How do I know if the disposal is installed correctly?
It should be firmly locked to the mounting ring, drain without backing up, run quietly without heavy vibration, and stay dry at all connections during a water test.