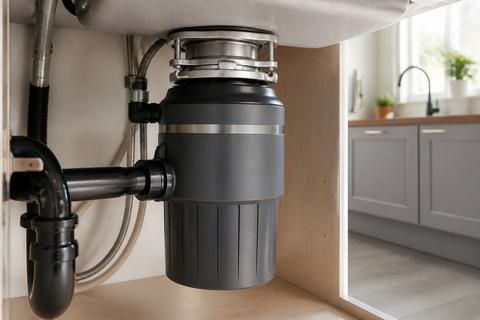
Garbage Disposal Flange Replacement

A wet sink rim after running your garbage disposal is one of the fastest ways to turn a minor annoyance into a bigger problem—water can damage cabinet bottoms and cause rust. When the issue is garbage disposal flange replacement, the fix is usually mechanical and seal-focused, not a full disposal swap. If you see water at the top of the sink opening or around the mounting ring, the flange seal is the first place to look.
For more help, see our GE Garbage Disposal Leaking: Stop Every Leak and Backup guide.
Know the Parts Before You Start
What the sink flange does and why it leaks
The sink flange (the top mounting piece under the sink) seals the connection between the disposal and the sink opening. Most flange systems rely on a compressing seal made with plumber’s putty, a dedicated gasket, or a manufacturer-specified sealant. Leaks happen when the seal doesn’t compress evenly, debris prevents full contact, the sink surface is rough or corroded, or the mounting ring loosens over time.
Common leak signs point to the flange: water appears at the top rim of the sink opening, around the mounting ring, or near the flange-to-sink interface right after water runs.
Tools, materials, and replacement parts you may need
Gather what you need before you start so you can keep the disposal supported and avoid leaks during reassembly.
- Replacement flange kit (match your disposal brand/model if possible)
- Plumber’s putty (for putty-style flanges) or the gasket/sealant specified in your kit
- Utility knife and putty knife (for old seal removal)
- Screwdriver (flat/Phillips as required for clamps and mounting hardware)
- Adjustable wrench or socket set
- Rubber gloves and a rag/towel (for cleanup)
- Flashlight (to inspect corrosion and mounting surfaces)
- Penetrating oil (for stubborn, rusted flange fasteners—optional)
- Towels or a small bucket (to catch water in the line)
When to replace the flange versus reseal it
Replace the flange when the mounting ring or flange face is damaged, warped, or heavily corroded, or when the seal area has pitted damage from long-term leaking. Reseal-only fixes work when the sink surface is solid, the flange parts are intact, and the old seal failed due to debris or an uneven initial install.
If water keeps showing after a careful tightening attempt, plan on replacement. If the flange is loose and the seal never compresses, simply adding more putty won’t hold—install a new flange and seal system.
Remove the Old Flange Safely
Disconnect power and clear the area
Start by making the job safe. Water and electrical connections don’t mix, and you’ll be working under the sink where hoses and wires are close.
- Turn off power to the disposal at the breaker (or switch) and confirm the disposal won’t start.
- Clear items from under the sink so you have room to set down parts and avoid tugging hoses.
- Lay towels around the disposal and have a bucket ready—residual water in the drain line can drip when connections loosen.
- If your disposal has a dishwasher connection, disconnect the dishwasher hose later—but keep the area dry now so you can see where leaks originate.
Detach the disposal and plumbing connections
With power off, you’ll remove the disposal from its mounting so you can access the flange.
- Unplug or disconnect the electrical connection as required by your disposal wiring method, then keep the cord/wiring clear.
- Disconnect the drain plumbing from the disposal outlet (loosen the clamp and separate the pipe).
- If the disposal has a dishwasher inlet, disconnect the dishwasher hose from the inlet or remove the inlet connection as your setup allows.
- Support the disposal with one hand while loosening the mounting hardware from below so the unit doesn’t drop when the flange comes free.
Break the old plumber’s putty seal
The old seal is what you’re breaking—be gentle with the sink surface to avoid scratches that will defeat the new seal.
- Use a utility knife to cut around the edge of the flange seam where putty contacts the sink.
- Slide a putty knife between the flange and sink to separate the seal.
- Work slowly all the way around, pulling up gently and alternating sides so you don’t pry in one spot.
- Once the seal releases, lift the flange/disposal assembly as needed to fully free it from the opening.
Remove a stubborn or rusted flange
Rust is the reason many flange replacements stall. The goal is controlled force—no bending the sink or damaging the opening.
- Apply penetrating oil to the flange fasteners or exposed threads from below.
- Let it sit for 10–20 minutes to loosen corrosion.
- Use the correct wrench or socket to loosen fasteners evenly—don’t crank at an angle.
- If the flange won’t move, support the sink so you don’t stress it, then use careful twisting to break remaining seal contact.
Clean and Prep the Sink Opening
Scrape away old putty and debris
A clean surface is what makes the new seal hold. Even a thin ring of old putty can create a leak path.
- Scrape off all old putty from the sink opening lip with a putty knife and utility knife.
- Remove residue until you reach clean, continuous material around the full circumference.
- Wipe away dust and crumbs with a damp rag, then dry thoroughly.
- If silicone residue is present (common in some installs), remove it mechanically until the surface is smooth and the new seal can seat fully.
Inspect the sink surface for damage or corrosion
Before you install the new flange, inspect the sink opening area closely. The sink surface must be flat enough for compression.
- Look for pitting, deep scratches, dents, or corrosion around where the flange seats.
- If the sink surface is uneven or pitted, the flange seal can’t compress correctly—plan on addressing the damage (repair kit or professional help) rather than repeating the same leak.
- Check whether the splash guard or baffle area interferes with flange seating.
Clean the rubber splash guard and related parts
The splash guard and rubber components affect how the disposal mounts and how water is directed—clean them so they seat properly.
- Remove and clean the rubber splash guard if it’s part of your mounting assembly.
- Wipe both sides and look for cracks, tears, or flattening from previous leaks or over-tightening.
- Replace any rubber pieces that are swollen, hardened, or damaged so the new flange sits evenly.
- Reassemble any hardware that returns the splash guard to its correct position before final flange installation.
Install the New Flange
Apply putty or sealant correctly
Sealant technique matters as much as sealant choice. Too little leaks; too much can prevent even compression.
- If your kit uses plumber’s putty, roll a small rope of putty and place it around the flange seating area—don’t smear it across the entire sink opening.
- If your kit uses a gasket system or silicone, follow the kit instructions and use only the specified product.
- Avoid getting putty into the disposal grind chamber opening.
- Position the flange immediately after applying seal so the seal material doesn’t dry or skin over in a way that reduces compression.
Set and tighten the flange evenly
Even tightening prevents gaps that create top leaks.
- Set the flange into the sink opening, aligning it with the mounting assembly.
- Hand-thread or loosely install the mounting hardware first to seat the flange correctly.
- Tighten mounting fasteners gradually and evenly, alternating sides so the flange compresses all around.
- Stop when the flange is secure and stable—over-tightening can distort parts and crush gaskets.
Reattach the disposal and align the mounting hardware
Now you’ll connect the disposal back to the flange assembly so everything stays centered.
- Raise the disposal into place while aligning the mounting tabs/keys with the flange mount.
- Ensure the unit seats fully onto the mounting ring before tightening any clamps.
- Reattach plumbing outlet and dishwasher inlet connections (if present) using the same clamps/gaskets you removed.
- Tighten connections snugly, not aggressively—side gaskets and clamps commonly seal best when properly aligned.
Test for Leaks and Finish Up
Run water and check the top seal
You’re verifying the flange-to-sink seal only once the disposal is mounted correctly.
- Restore power only after you’ve reconnected everything securely.
- Turn on a faucet and let water run while watching the sink opening rim and mounting ring area underneath.
- Look for moisture forming between the flange and sink lip.
- If you see seepage, shut off water and power, then address the seal and tightening.
Tighten problem spots without overdoing it
If a minor seep appears, you may be able to correct it with targeted tightening—especially if debris wasn’t the cause.
- Turn off power and stop the water.
- Check the flange mounting fasteners for looseness and tighten evenly a small amount.
- If it still leaks, disassemble the flange and reinstall with a fresh seal (don’t keep tightening in larger increments).
- Recheck that the sink surface and splash guard weren’t shifted during mounting.
Restore power and confirm normal operation
After the seal holds under water, confirm the disposal runs without new leaks.
- Restore power at the breaker or switch.
- Turn on the disposal and run cold water through the sink at the same time.
- Listen for normal operation and watch under the sink for any new drip at the plumbing or disposal connection points.
- Stop the unit if you notice new leaks from areas other than the top flange, because the fix may be at the drain or dishwasher inlet rather than the flange.
Troubleshooting Common Problems
Fix leaks that continue after replacement
A flange replacement can still leak if a sealing surface or mounting factor wasn’t corrected.
- Recheck for leftover debris under the flange—scrape and clean again if you suspect contamination.
- Verify the flange was tightened evenly; uneven compression creates pinhole gaps.
- Inspect the sink surface around the opening for pitting or damage that blocks full contact.
- Check the mounting gasket or splash guard condition—worn rubber prevents a tight seal even with correct putty.
- If water appears lower on the disposal or at the discharge line, the leak source is likely the disposal body or drain connection, not the flange.
Handle bad alignment or a loose mount
Alignment issues can show up immediately as wobble or persistent seepage around the mounting ring.
- Ensure the disposal is seated fully onto the flange mount before tightening.
- Loosen mounting hardware and realign the unit so the inlet and discharge connections aren’t under stress.
- Tighten the flange fasteners gradually and evenly to draw the parts into uniform contact.
- Confirm the splash guard sits correctly—misplacement can push the unit off-center and prevent seal compression.
- If the flange kit includes a specific aligning spacer or gasket, install it exactly as specified.
Know when the sink or disposal needs deeper repair
Some failures aren’t solvable with flange replacement alone.
- If the sink opening is damaged beyond minor scratches—deep dents or severe corrosion—replace or repair the sink area before repeating flange installs.
- If you find water dripping from the disposal bottom housing, the internal seal has failed and the disposal should be replaced, not repaired.
- If the discharge tube gasket or dishwasher inlet area leaks, address those connections instead of repeatedly replacing the flange.
- If the disposal mounting hardware is missing, bent, or incompatible with the flange kit, replace the mounting assembly components to restore correct compression.
Related Repair Questions People Ask
How to remove a garbage disposal flange without damaging the sink
Support the sink, disconnect the disposal, and work the flange loose with controlled force. Cut through the old putty line with a utility knife and separate the flange gradually with a putty knife to avoid gouging the sink surface. If the flange is stuck, apply penetrating oil to the underside fasteners and let it soak before loosening. Keep twisting pressure even from different sides so you don’t flex the sink. Work slowly and keep the flange moving upward only when the seal has released all the way around.
How to replace a garbage disposal flange from above the sink
From above, you can replace the sink flange itself, but you still need access to detach the disposal and mounting hardware safely. Turn off power, disconnect the disposal wiring and plumbing as necessary, then remove the disposal to fully access the mounting ring. Once the disposal is out, you can remove the old flange, clean the opening, apply the correct seal material, and set the new flange while aligning it with the mounting assembly. Reinstall the disposal onto the mounting hardware, reconnect plumbing, and run water to check for leaks at the top seal.
How to clean a garbage disposal rubber flange
Cleaning keeps water from bypassing the seal and helps the flange sit evenly. With power off, remove the disposal mounting components that include the rubber flange or splash guard. Wipe away grime with a damp cloth and mild cleaner, then inspect the rubber for cracks, tears, hardening, or flattening. If the rubber is damaged or deformed, replace it—cleaning alone won’t restore proper compression. Reinstall the rubber in its correct orientation and ensure it sits fully before tightening the mounting ring.
Frequently Asked Questions
How do I know if the leak is coming from the flange and not the disposal body?
If water appears at the top of the sink opening or around the mounting ring, the flange seal is the likely source. Leaks lower on the unit usually point to the disposal body, drain connections, or dishwasher inlet.
Can I replace a garbage disposal flange without replacing the whole disposal?
Yes. The flange is a separate part on most installations, so you can replace it without changing the disposal itself as long as the mounting assembly is in good condition.
Do I need plumber’s putty for a new sink flange?
Most metal sink flanges use plumber’s putty, but some manufacturers recommend silicone or a specific gasket system. Follow the disposal or flange instructions for the best seal.
Why is my garbage disposal flange still leaking after I replaced it?
Common causes include uneven tightening, leftover debris under the flange, a damaged sink surface, or a worn mounting gasket. Recheck the seal and the alignment of the mounting ring.
How do I remove an old garbage disposal flange that is stuck?
Support the sink, disconnect the disposal, and work the flange loose from below. Penetrating oil, a putty knife, and careful twisting can help, but avoid bending the sink or scratching the basin.