Garbage Disposal Not Turning On: How to Fix No Power
If your garbage disposal not turning on, it’s usually because the unit isn’t actually getting electrical power or the motor is locked up from a jam. When the switch does nothing—no hum, no sound, no movement—the fastest path is to check power, then reset/un-jam, and only then move to wiring, drain blockages, and motor failure. Work through the steps below in order to pinpoint the exact cause quickly.
For more help, see our GE Garbage Disposal Not Working: Diagnose Every Common Cause guide.
Confirm It’s a Power Problem
Check the outlet, switch, and breaker
Start by confirming the disposal is getting power at the wall.
- Turn on a nearby item (like a lamp) plugged into the same outlet (or run the outlet’s power test if you have one).
- Flip the disposal wall switch OFF, then ON. If your disposal is hardwired at a switch, verify the switch controls that outlet/circuit.
- Open your breaker panel and reset any tripped breaker fully to OFF, then back to ON.
- If the disposal is on a GFCI outlet, press the TEST and RESET buttons on the GFCI device.
Test whether the disposal is getting any power
If the switch is on but the disposal is dead, test for power at the disposal circuit.
- Turn OFF power at the breaker before touching anything near the unit.
- Remove the disposal’s lower access area cover plate (if present) so you can access the electrical connections.
- Use a non-contact voltage tester on the wires supplying the disposal or on the cord/plug connection area.
- Restore power and note whether voltage is present when the wall switch is ON. If you have no voltage at the disposal while the switch is ON, the issue is upstream (breaker, wiring, or switch).
Rule out a tripped GFCI or overloaded circuit
A GFCI trip or an overload can kill power to the disposal even if the breaker seems fine.
- Locate any GFCI outlet the disposal might share, then press RESET firmly until it clicks.
- If the disposal is on a dedicated circuit, check that breaker again—resetting the correct breaker matters.
- If other outlets on the same circuit are also dead, the circuit is overloaded or tripped. Spread the load across different circuits and avoid running the dishwasher/other high-draw appliances during disposal troubleshooting.
Reset and Unjam the Motor
Use the reset button the right way
A tripped overload reset button is the #1 reason a disposal won’t start.
- Turn OFF power at the breaker switch.
- Wait 5–10 minutes for the motor to cool.
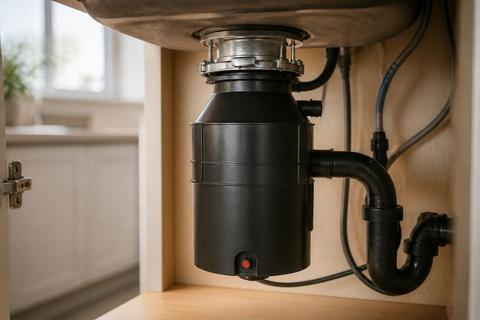
- Press the red reset button on the bottom of the motor housing (push in until it clicks).
- Restore power and turn the wall switch ON.
Free a jammed flywheel safely
A jammed impeller plate can stop the motor.
- Turn OFF power at the breaker.
- Allow the unit to sit a few minutes so it fully powers down.
- Insert a 1/4-inch hex (Allen) wrench into the center hex socket on the underside of the disposal.
- Rotate the wrench back and forth through a full rotation to free the flywheel/impeller plate.
- Press the reset button (red overload reset on the bottom housing), then restore power and try the switch again.
Know when the disposal is seized beyond a reset
Reset won’t fix a disposal that’s mechanically seized or has a damaged motor. Stop forcing it when you feel heavy grinding or the hex wrench won’t move freely even after full power-off.
- Turn OFF power at the breaker.
- Try the hex wrench movement one final time—if it remains immovable, stop.
- Listen for motor symptoms: if pressing reset changes nothing and the disposal is dead (or repeatedly trips), the impeller may be damaged or the motor may be failing.
- Proceed to wiring checks and motor/repair decision steps, because repeated mechanical forcing can worsen damage.
Inspect the Sink and Drain Area
Clear a clog that is stopping the unit from starting
Even if power is fine, a drain restriction can prevent proper starting and cause repeated overload trips.
- Turn OFF power at the breaker.
- Check whether water is backing up in the sink—standing water indicates a restriction downstream.
- Use sink-safe tools: a plunger (for accessible sink basin clogs) or a drain auger from above (do not push hard into the grind chamber).
- Remove any obvious obstruction at the visible drain opening using tongs or pliers—never use your hand.
Check for a blocked drain flange or mounting issue
A misaligned or blocked mounting area can restrict the grind chamber and prevent free movement.
- Inspect the sink drain flange area for debris and build-up.
- Look for signs the disposal is not sitting flush against the mounting bracket.
- If you see the unit shifted or uneven, the mounting ring/bracket may be loose.
- Reseat and tighten the mounting assembly only with power OFF—an unstable mounting can also create vibration that leads to jams.
Look for leaks, corrosion, or a loose connection
Leaks and corrosion can point to a failing seal or a connection that won’t hold under vibration.
- Look for water pooling under the disposal and around the sink flange.
- Inspect the power cord/strain relief area and the connections through the access area cover—loose connections can cause a dead unit.
- Check for corrosion around the mounting flange and wiring conduits.
- If the disposal leaks from the bottom housing, the internal seal is failing and the unit needs replacement, not a simple tighten-and-go fix.
Check the Wiring and Switch Path
Verify the wall switch and disposal wiring
If the unit is truly receiving no power when the wall switch is ON, the switch or wiring path is likely.
- Turn OFF breaker power.
- Remove the wall switch cover and ensure the switch wires are secure and not burned.
- With a multimeter or proper tester, confirm the switch passes line power when toggled.
- If the switch tests bad, replace the switch. If it tests good, inspect downstream wiring to the disposal connections.
Inspect the cord, cover plate, and plug connection
For cord-and-plug disposals, a simple connection issue can stop operation completely.
- Turn OFF power at the breaker.
- Inspect the plug connection: reseat if it has loosened, and ensure the cord is fully seated in the disposal’s receptacle.
- Check the cover plate and strain relief are intact—damage here can prevent stable contact.
- If you find a damaged cord (cuts, nicks, exposed conductors), replace the cord assembly rather than taping it.
Understand when wiring damage means replacement
If wires are burned, cracked, or the insulation is compromised, don’t patch and reuse—replace the affected components.
- If the disposal’s wiring insulation shows scorching, melting, or exposed copper, the disposal should not be put back into service.
- If the switch box wiring is damaged, replacing the switch and repairing wiring inside the box may be required by code—use a qualified electrician if you’re unsure.
- When wiring issues appear alongside a failed motor or severe corrosion, replacement is usually the smarter fix.
Decide Between Repair and Replacement
Spot signs the motor has failed
Motor failure is common when a disposal is dead even after reset and freeing the flywheel.
- If pressing reset makes no difference and there’s no hum or movement, the motor may be burned out.
- If the disposal hums but won’t spin after un-jamming, the motor may have seized internally or the bearings/impeller drive may be damaged.
- If the red overload reset trips repeatedly within minutes, the motor is likely failing under load.
- Any burning smell or visible electrical scorching points to a motor/electrical failure—replace rather than keep troubleshooting.
Compare repair cost to replacing the unit
Weigh the cost of parts and labor against a new disposal.
- If repairs involve major electrical work, a new switch, or extensive disassembly, the labor cost climbs quickly.
- A replacement disposal often includes a fresh warranty, new seals, and updated components.
- Repeated jams plus frequent resets are a strong sign the unit is nearing end-of-life.
- If multiple systems have failed (motor, seals, mounting), replacement typically costs less than ongoing troubleshooting.
When a new disposal is the smarter fix
Replace the disposal when damage is beyond safe, practical repair.
- Replace if water leaks from the body/bottom housing—internal seal failure usually means replacement.
- Replace if the motor is burned out or the unit is heavily corroded and connections are compromised.
- Replace if the disposal repeatedly jams and trips reset despite clearing jams.
- If you’re installing dishwasher integration too, ensure the correct inlet knockout is removed and the discharge route is clear to prevent future back-ups.
Prevent Future Power and Clog Problems
Use the disposal correctly to avoid jams
Good usage prevents most overload trips and no-start conditions.
- Run cold water before turning on the disposal, then keep water running for 15–30 seconds after grinding.
- Avoid sending fibrous items like celery, corn husks, potato peels (in large amounts), and large bones into the grind chamber.
- Dispose of grease slowly in small amounts only; excessive grease can solidify in pipes.
- Never reach into the chamber—if something falls in, use tongs or pliers with power OFF to retrieve it.
Clean and deodorize without damaging the unit
Cleaning keeps the disposal efficient and reduces clogs from buildup.
- Freeze leftover citrus juice or lemon peels in ice cubes, then grind the cubes to deodorize and scour.
- For routine cleaning, grind small amounts of baking soda followed by cold water, then flush with more cold water.
- Avoid pouring harsh chemicals directly into the disposal—use mechanical cleaning first when there’s a blockage.
- If the disposal backs up after cleaning, stop adding materials and clear the drain before using again.
Build a simple maintenance routine
A short routine prevents “dead” and jam-causing buildup.
- Once a week, run the disposal with cold water for a short grind of small food scraps to keep the impeller plate clear.
- Inspect sink strainers and drain openings regularly; removing debris upstream reduces jams.
- Check for early leaks around the sink flange and bottom housing. Addressing a loose mounting ring early can prevent more serious failure.
- If the unit starts to rattle, stop using it and clear the jam—don’t keep grinding through abnormal noise.
Frequently Asked Questions
Why did my garbage disposal stop working suddenly?
The most common causes are a tripped reset button, jammed impeller, tripped breaker, bad switch, loose wiring, or a failed motor. Start with the easiest power checks first: confirm the wall outlet/switch/breaker, then press the red overload reset button and free the flywheel if needed. If the unit is dead even after reset and un-jamming, move to wiring checks and then motor failure signs.
What should I do if the disposal has power but won’t spin?
Turn off power at the breaker, then check for a jam and press the reset button. If the motor hums or the shaft won’t move, the unit may be seized or the motor may be failing. Use a 1/4-inch hex (Allen) wrench in the bottom hex socket to rotate the flywheel before retrying, and stop if the flywheel won’t move freely.
How do I know if the outlet or breaker is the issue?
If the disposal is completely dead, test the outlet and inspect the breaker panel. Also check any GFCI in the circuit by pressing RESET until it clicks. If other nearby appliances also lost power, the problem is likely upstream of the disposal rather than the unit itself.
Is it safe to use a wrench to free the disposal?
Yes, if you first shut off power at the breaker. Use the correct disposal wrench on the bottom hex socket to rotate the flywheel and break a jam loose. Never put your hand into the grind chamber; use tongs or pliers with power off to remove dropped items.
When should I replace a garbage disposal instead of repairing it?
Replace it if the motor is burned out, the unit leaks from the body, or the disposal is old and repeatedly jamming. Frequent repairs often cost more than a new unit, especially when seals fail or the motor trips overload protection even after resetting and clearing the jam.