Garbage Disposal Drain Plug Removal
If your dishwasher won’t drain and you’ve already ruled out a clogged hose, the issue is often garbage disposal drain plug removal. That small knockout plug inside the disposal’s dishwasher inlet can block the drainage path and leave water sitting in the tub. The good news: with the right safety steps, you can remove it and restore proper flow.
For more help, see our GE Garbage Disposal Installation: Removal, Wiring, and Setup guide.
Identify the Dishwasher Knockout Plug
What the drain plug does
The dishwasher knockout plug is a factory-installed cap that blocks the disposal’s dishwasher inlet port. When you connect a dishwasher, you remove that cap so the dishwasher drain line can discharge directly into the grind chamber. Without removal, the dishwasher water has nowhere to go inside the disposal, so it backs up and drains slowly.
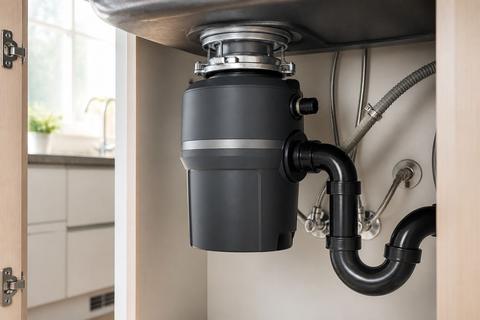
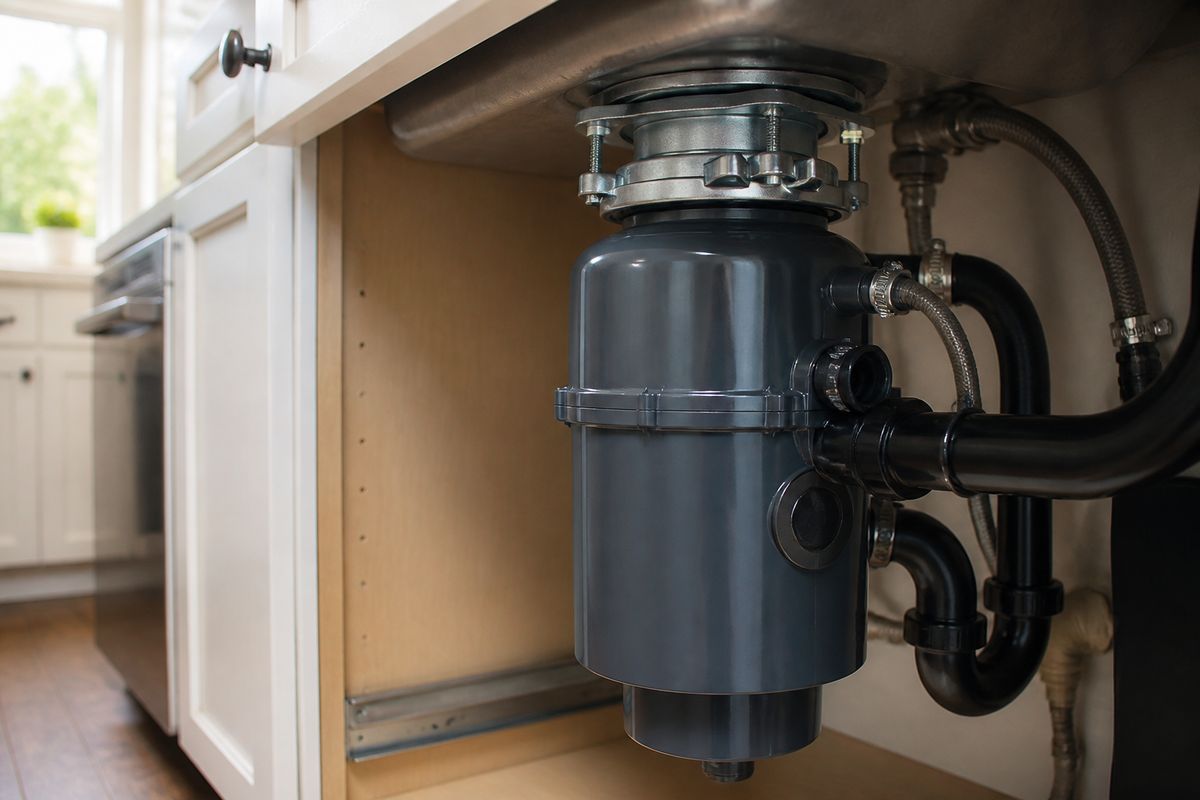
On most units, the plug sits inside the inlet area labeled for dishwasher connection (often called the dishwasher inlet, knockout port, or inlet nipple). You remove it so water can pass from the hose connection into the disposal housing. If it remains in place, the dishwasher outlet connection may look “installed,” but drainage still fails.
How to confirm your disposal needs it removed
Start by locating the disposal’s dishwasher inlet where the dishwasher hose connects. Look for an open port or a recessed circular area with a cap-like cover—if you see a knockout marked for dishwasher use, that’s the one to remove.
Then check the inside of the inlet area: if a solid plastic piece blocks the opening, it’s the knockout plug. Also inspect your dishwasher side. If your dishwasher hose end connects to a nipple that normally mates with an opened disposal inlet, the disposal must be punched through first for flow to happen.
Finally, confirm what you’re working with: some setups are missing the inlet opening entirely until the disposal plug is removed. In that case, no amount of adjusting the hose will fix the blockage.
Signs the plug is still in place
The most common sign is standing water in the dishwasher tub after the cycle completes. You may also notice slow draining where the water level drops only slightly before stopping.
Other clues include gurgling sounds during drain, water backing up into the sink area, or drainage errors shown by the dishwasher control panel. If you disconnected and reconnected the hose, the issue persists because the internal drain path is still blocked.
You can also see related symptoms at the connection point: the hose may fill and then not discharge into the disposal, leaving water pooled at the disposal inlet area. If your disposal is otherwise running normally for sink use, a remaining knockout plug is the likely bottleneck.
Safety First Before You Start
Turn off power at the switch and breaker
Before touching the disposal or its inlet area, shut off electricity at both the wall switch and the breaker. Flip the wall switch to OFF, then turn off the corresponding breaker for the kitchen circuit.
To verify power is off, try to turn on the garbage disposal switch—no hum or startup should happen. If the disposal is hardwired or controlled by a different switch, still cut breaker power first, because you’ll be working around the grind chamber area.
Never rely on “it seems off.” A knockout plug removal can involve contact near components that can still be live if wiring is miswired or if the switch does not fully interrupt power.
Gather the right tools
For drain plug removal, you typically need a screwdriver and a hammer. Use a flat-head screwdriver to punch the plug if it’s designed to be knocked out, or use the screwdriver and a wooden dowel to drive the plug out without excessive metal-on-metal force.
You may also need work gloves and a flashlight for visibility under the sink. Have a rag and a shallow bucket ready to catch water or debris, since the inlet chamber can hold residual moisture.
If you’re working in tight space, a pair of tongs or pliers helps if you accidentally drop hardware while clearing the port. For troubleshooting later, a 1/4-inch hex (Allen) wrench is useful for freeing jams, but only if you encounter disposal motor issues.
Prepare for water and debris
Clear out the area under the sink and place a towel around the disposal to catch splashes. Line a bucket or pan beneath the dishwasher inlet so any trapped water can drain when the plug is removed.
Wear eye protection because small plastic fragments can fall into the unit. Move any dishes, cleaning products, or containers away from the work zone so you don’t knock them into the disposal.
When you knock or pull the plug, expect water to move. Keep rags ready to wipe the hose connection and disposal face so you can see whether the inlet is fully open afterward.
Remove the Knockout Plug Correctly
Find the knockout port on the disposal
Start under the sink and identify the dishwasher inlet port. It’s the connection area labeled for dishwasher drainage and is separate from the sink drain opening.
Look closely at the inlet nipple and surrounding ring. The knockout plug is inside the port and may appear as a plastic disk or a cap-like piece covering an opening. Shine a flashlight into the inlet; if you see a recessed plug surface instead of a clear hole, that’s the one to remove.
If your disposal has multiple ports, only remove the one designated for the dishwasher. The sink drain opening must remain intact, and removing the wrong port can create leaks or improper drainage paths.
Loosen the plug without damaging the inlet
With power off, insert the tip of a flat-head screwdriver into the knockout area. Use the hammer to tap the screwdriver handle firmly to break the plug free.
Work around the edge rather than striking one point repeatedly; this helps prevent cracking that could leave fragments. Keep your strikes controlled so you don’t damage the inlet chamber or the metal mounting surfaces near the dishwasher connection.
Once the plug loosens, stop tapping and switch to pulling. If your plug design uses a tabbed cap, wiggle the screwdriver to break remaining seams before attempting to lift it out.
Avoid dropping tools into the grind chamber. If something slips, stop and retrieve it with tongs or pliers rather than using your hand.
Check that the plug has fully released
After tapping, confirm the plug has moved completely and is no longer blocking the inlet. Look and feel for an opening—there should be a clear path where water from the hose can pass.
You may need to remove a loosened plug piece from inside the inlet area. Use tongs or pliers to pull out the plastic if it’s fallen partway and partially blocks the port.
Make sure no fragments remain in the connection area. Any leftover pieces can restrict flow and still cause slow draining.
Once the port is fully open, wipe the inlet area clean so the hose connection seats tightly without debris interfering with the seal.
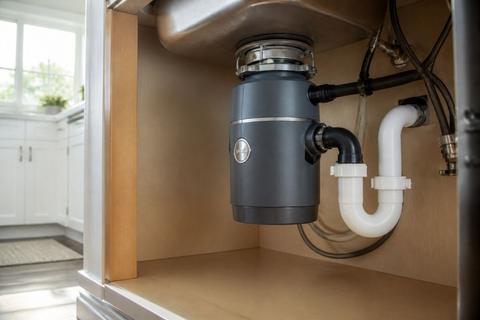
Connect the Dishwasher Drain Line
Attach the hose and clamp securely
Slide the dishwasher drain hose onto the disposal’s dishwasher inlet. Ensure the hose end seats fully over the outlet and sits flush so the connection forms a tight seal.
Install the clamp and tighten it firmly using a screwdriver until it grips the hose without cutting into it. The clamp must be positioned to cover the hose over the nipple area, not just the outer curve of the tubing.
If your disposal uses a discharge tube or specific connector, follow the physical fit you see—don’t force a mis-sized hose. A proper fit prevents leaks and keeps the hose aligned for draining.
Also make sure the hose is connected to the correct port on the disposal. A wrong connection port can send water back where it shouldn’t go and cause standing water.
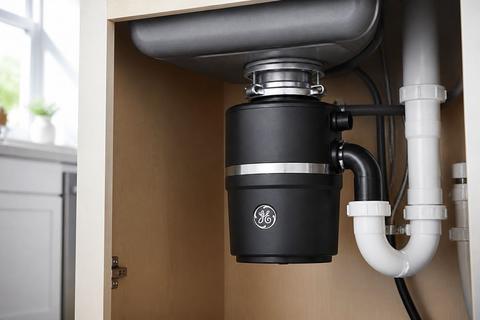
Avoid kinks, sags, and backflow
Route the dishwasher hose so it slopes downward toward the disposal without loops. Avoid kinks and sharp bends—these create flow resistance and can cause incomplete draining even with the plug removed.
Do not let the hose form a high “sag” under the sink. Water can collect in a sag and encourage odors or partial blockages.
Keep the hose above standing water lines and ensure it doesn’t contact sharp edges that could wear it. If your setup uses a high loop or mounting guide, align the hose with it so drainage flows in the correct direction.
Backflow prevention is critical: the hose must connect securely so water can’t push out of the connection during the dishwasher drain cycle.
Test the connection for leaks
With power still off or at least with the area clear, run a controlled leak check. First, turn on water briefly at the sink and observe the disposal inlet connection for drips.
Then start a short dishwasher drain cycle (or let the dishwasher run until it enters the drain portion) while watching the hose clamp and inlet area under the sink. Look for water seeping around the hose end or dripping from the disposal’s dishwasher inlet area.
If you see leaking, shut off the dishwasher cycle and re-seat the hose before tightening the clamp again. Leaks at this connection mean the hose isn’t fully seated or the clamp isn’t positioned correctly.
If there’s no leak but drainage still fails, move to troubleshooting a stuck plug or clogged/disconnected hose routing.
If the Disposal Is Already Installed or Plugged In
Troubleshoot a stuck or missed knockout plug
If the disposal is installed and the dishwasher still won’t drain, you likely missed the knockout plug or it didn’t fully come out. Turn off power at the switch and breaker first.
Use a flashlight to inspect the dishwasher inlet port. If you still see a plastic disk, cap, or any partial blockage, remove it with the screwdriver-and-hammer method. Break it free, then pull any remaining fragments out with tongs or pliers.
If the plug is lodged deeper and tapping doesn’t shift it, stop and re-check that you’re striking the correct knockout area. For tight access, removing nearby splash guards or adjusting the hose may improve visibility.
Do not insert your hand into the grind chamber. Use tools only.
What to do if the dishwasher still will not drain
If the plug is removed and the dishwasher still won’t drain, check the hose routing and blockage points next. Ensure the drain hose isn’t kinked or sagging under the sink, and confirm it slopes down toward the disposal.
Look for clogs in the dishwasher air gap (if installed) or in the hose section between dishwasher and disposal. Remove and inspect the hose if it’s accessible and clear.
Also verify you actually connected to the disposal’s dishwasher inlet port. A hose connected to the wrong location can look correct but won’t drain into the grind chamber.
Finally, run the disposal briefly with the switch on after restoring power. If the disposal isn’t draining properly for sink waste, address the disposal itself before returning to dishwasher troubleshooting.
When to call a plumber or appliance tech
Call a plumber or appliance technician if you can’t access the inlet safely, the knockout plug is impossible to remove without damaging the disposal housing, or you find internal damage.
Get professional help if the dishwasher connection repeatedly leaks after re-seating and clamping the hose correctly. A persistent leak at the disposal flange often indicates a mounting or seal problem that requires proper reinstallation.
Also call if the disposal shows electrical or motor problems. For example, a disposal that hums but doesn’t spin can have a jam requiring mechanical clearing; a disposal that leaks from the bottom housing typically needs replacement rather than repair.
If you’re dealing with hard-to-reach wiring or you’re unsure which breaker controls the unit, professional service prevents unsafe handling.
Keep the Disposal and Kitchen Drains Smelling Fresh
Clean the disposal safely after installation
After you remove the knockout plug and reconnect the dishwasher, clean away any debris. Turn off power, then use tongs or pliers to remove visible bits from the inlet area if needed.
Run cold water into the sink and start the disposal briefly with the switch on. Let it run long enough to flush loosened residue down the drain—then stop and repeat once if you still see debris being pushed out.
Avoid dumping harsh chemicals into the disposal. Combine cleaning actions that are mechanical and water-assisted, not chemical reaction-based.
For ongoing maintenance, keep sink waste minimal and run water during and after disposal use to wash down food particles that can create odors.
Use simple deodorizing habits for the sink and trash can
Odors often come from trapped food residue in multiple places, not just the disposal. Scrape plates thoroughly before loading the sink, and wipe standing water or food splatter from the countertop around the disposal.
Empty the trash regularly and keep a tight-lid container. A full or warm trash can releases smells that make it seem like the disposal is the problem.
Once a week, run water with the disposal after light kitchen use to keep the chamber flushed. A clean sink area and fresh trash habits reduce the buildup that creates lingering smells.
If you notice persistent odor right after a dishwasher connection change, inspect the hose path first—standing water in the line can create odor even when the disposal is clean.
Prevent odors with regular maintenance
Prevent odor buildup by maintaining consistent water flow during disposal use and avoiding grinding fibrous materials that cling to components. Run water before starting the disposal, keep it running during grinding, and continue for a short time afterward.
Clean the splash area and check for lingering residue at the inlet/hose connection. A small leak or dampness can contribute to smell and residue accumulation.
If you used the disposal recently and it smells, flush it with cold water and grind a small amount of clean, non-greasy material (like ice cubes) to help clear fine residue on the grind surfaces.
Most importantly, ensure the dishwasher drains completely. Standing water caused by a missed knockout plug or a routed hose with sags will create odor and drainage errors quickly.
Frequently Asked Questions
How do I know whether my garbage disposal drain plug has been removed?
Look for an open dishwasher inlet on the disposal and confirm water can pass through the connection. If the knockout plug is still in place, the dishwasher drain hose will not have a clear path into the disposal.
Can I remove the knockout plug after the disposal is installed?
Yes, but shut off power first and work carefully. If access is tight or the plug is stubborn, it may be safer to disconnect power and have a plumber handle it.
What happens if the dishwasher is connected to a disposal with the plug still in?
The dishwasher cannot drain properly, which can leave standing water in the tub and cause drainage errors, slow draining, or leaks at the hose connection.
Do I need any special tool to remove the drain plug?
Usually no special tool is required beyond a screwdriver and a hammer or wooden dowel, but the exact method depends on the disposal design and installation access.
Why does my garbage disposal smell after installation?
New installations can collect debris, and a disposal that is not cleaned regularly can develop odors. Flushing it, removing residue, and keeping the sink area clean usually helps.